GCR

让你的Shell更加强大

GCR

Make your shell more powerful

GCR: 基于zsh的终端集成插件, 让你更自然地掌控终端!

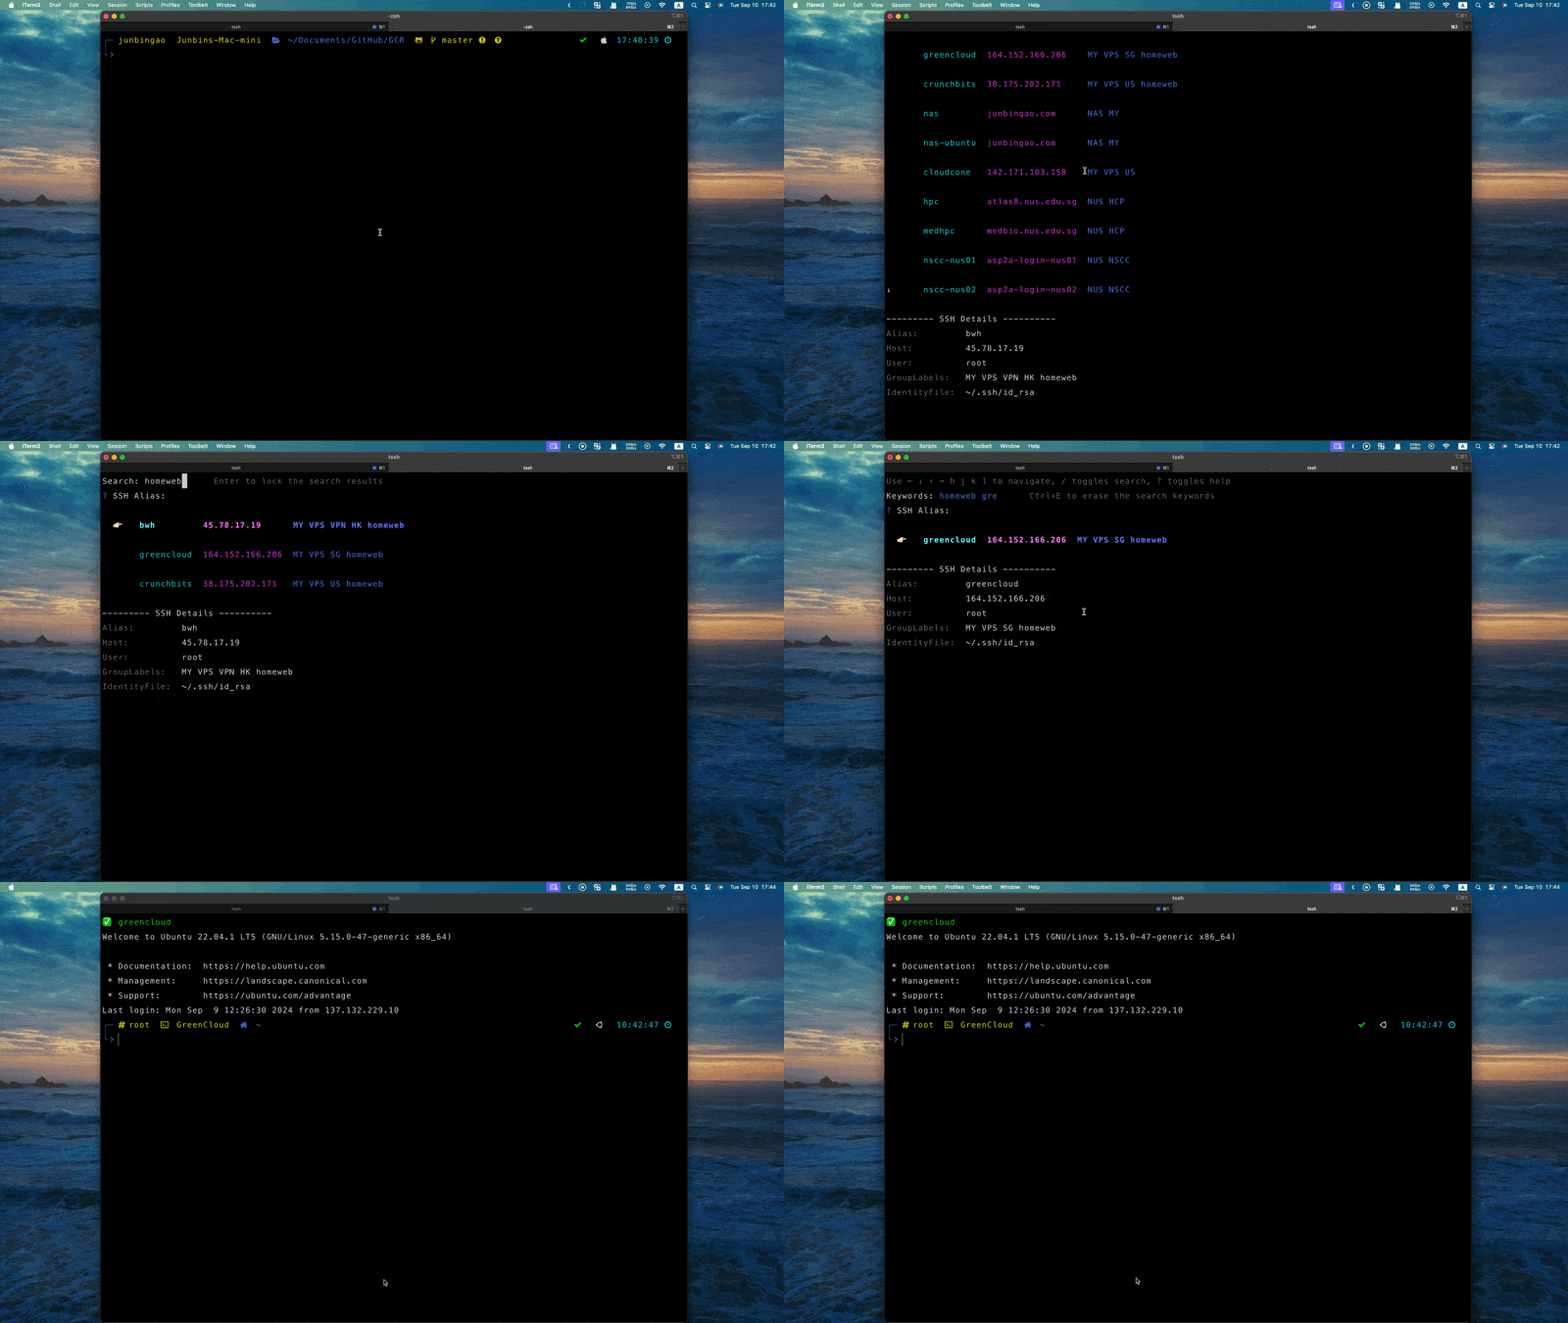
服务器登陆新范式!集成开源工具tssh,自定义多服务器的分组和智能登陆,更方便地管理你的服务器集群,不再需要记忆复杂的服务器地址和别名!

A new paradigm for server login! Integrate the open source tool tssh, customize multi-server grouping and intelligent login, and manage your server cluster more conveniently. You no longer need to remember complex server addresses and aliases!

Demo 1

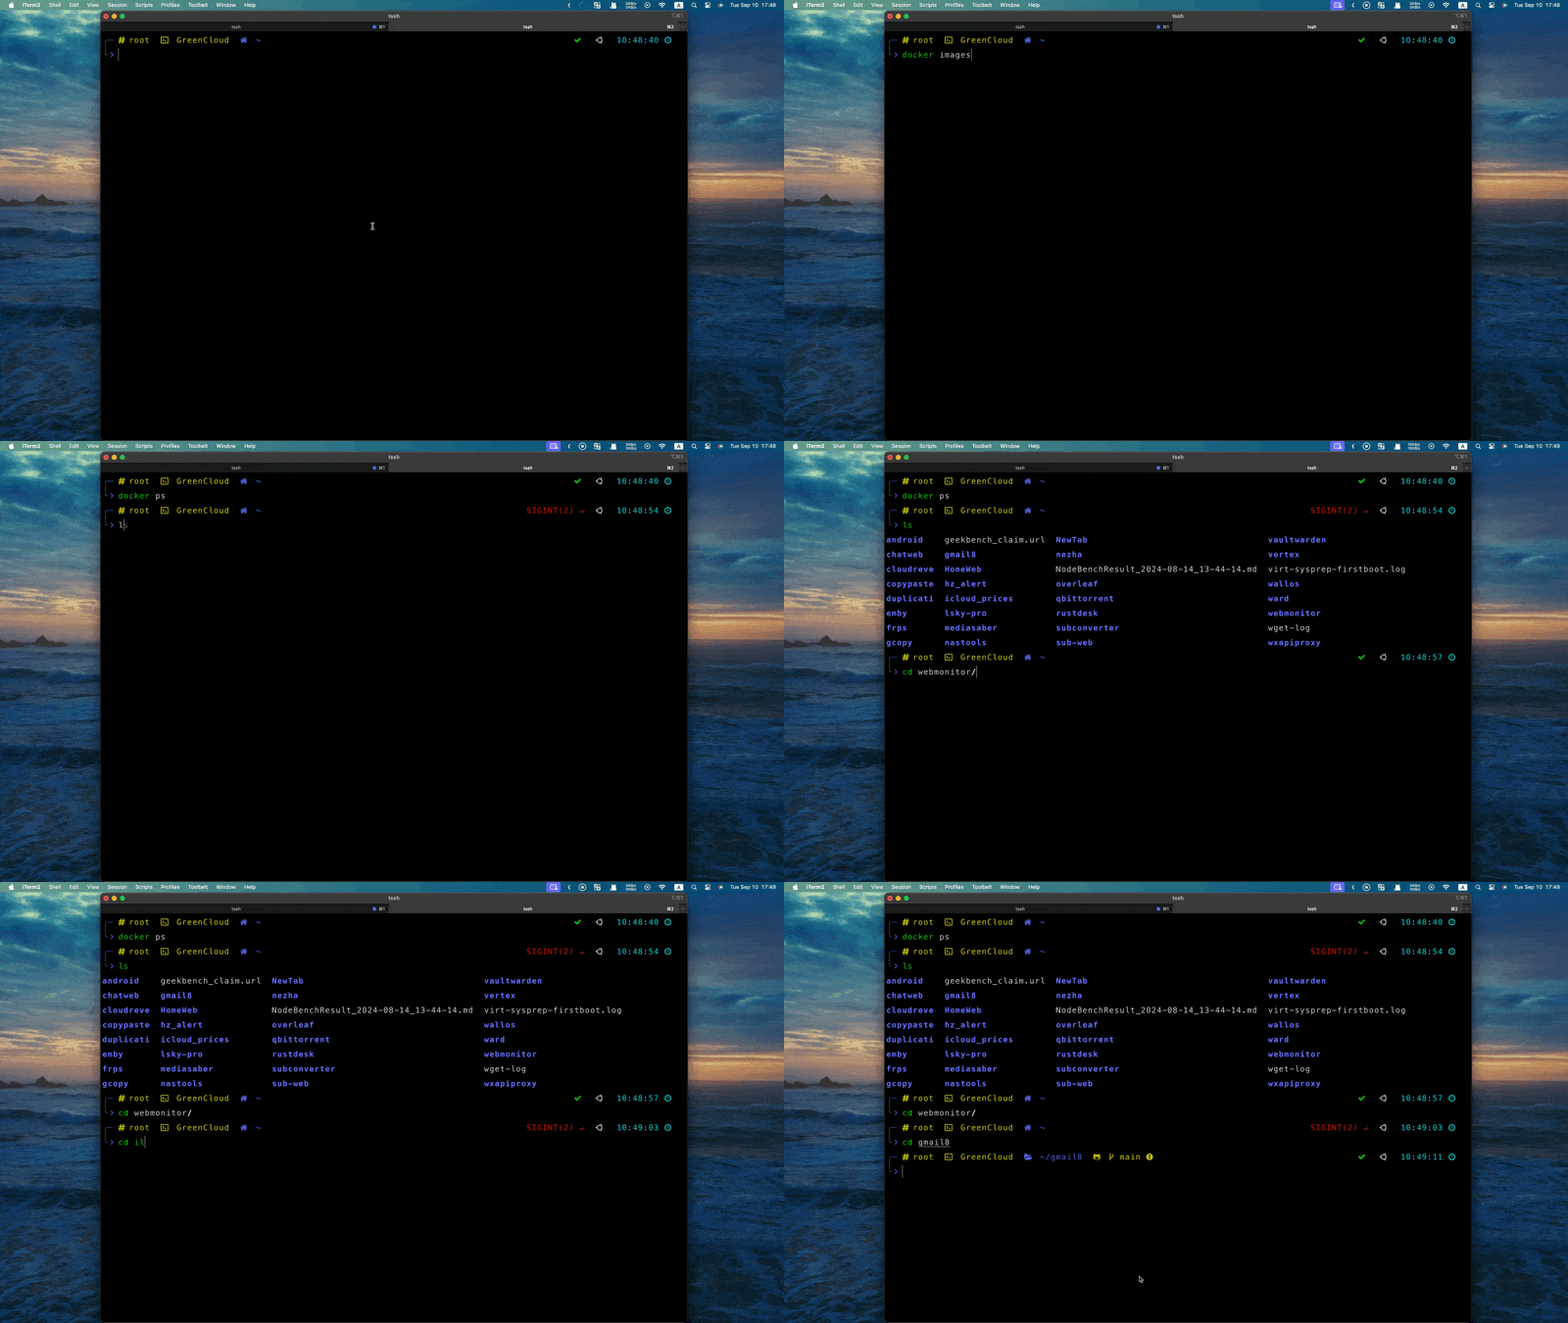
终端键入新范式!自动提示和补全:基于zsh强大的生态,集成了自动提示和补全的开源工具,可以记忆你过去使用的终端命令并在你需要的时候给你提示,不再只基于开头匹配,不再区分大小写!

A new paradigm in terminal typing! Automatic prompts and completion: Based on the powerful ecology of zsh, an open source tool that integrates automatic prompts and completion can remember the terminal commands you used in the past and give you prompts when you need them. It is no longer just based on the beginning of the match. case sensitive!

Demo 2

软件安装新范式!集成多个常用的软件安装包,让你在不同平台安装常用的开发工具时一键完成,无需顾虑太多,不再需要一步一步输入安装命令!

A new paradigm for software installation! Integrating multiple commonly used software installation packages allows you to install commonly used development tools on different platforms with one click. You don’t have to worry too much and you no longer need to enter installation commands step by step!

Demo 3

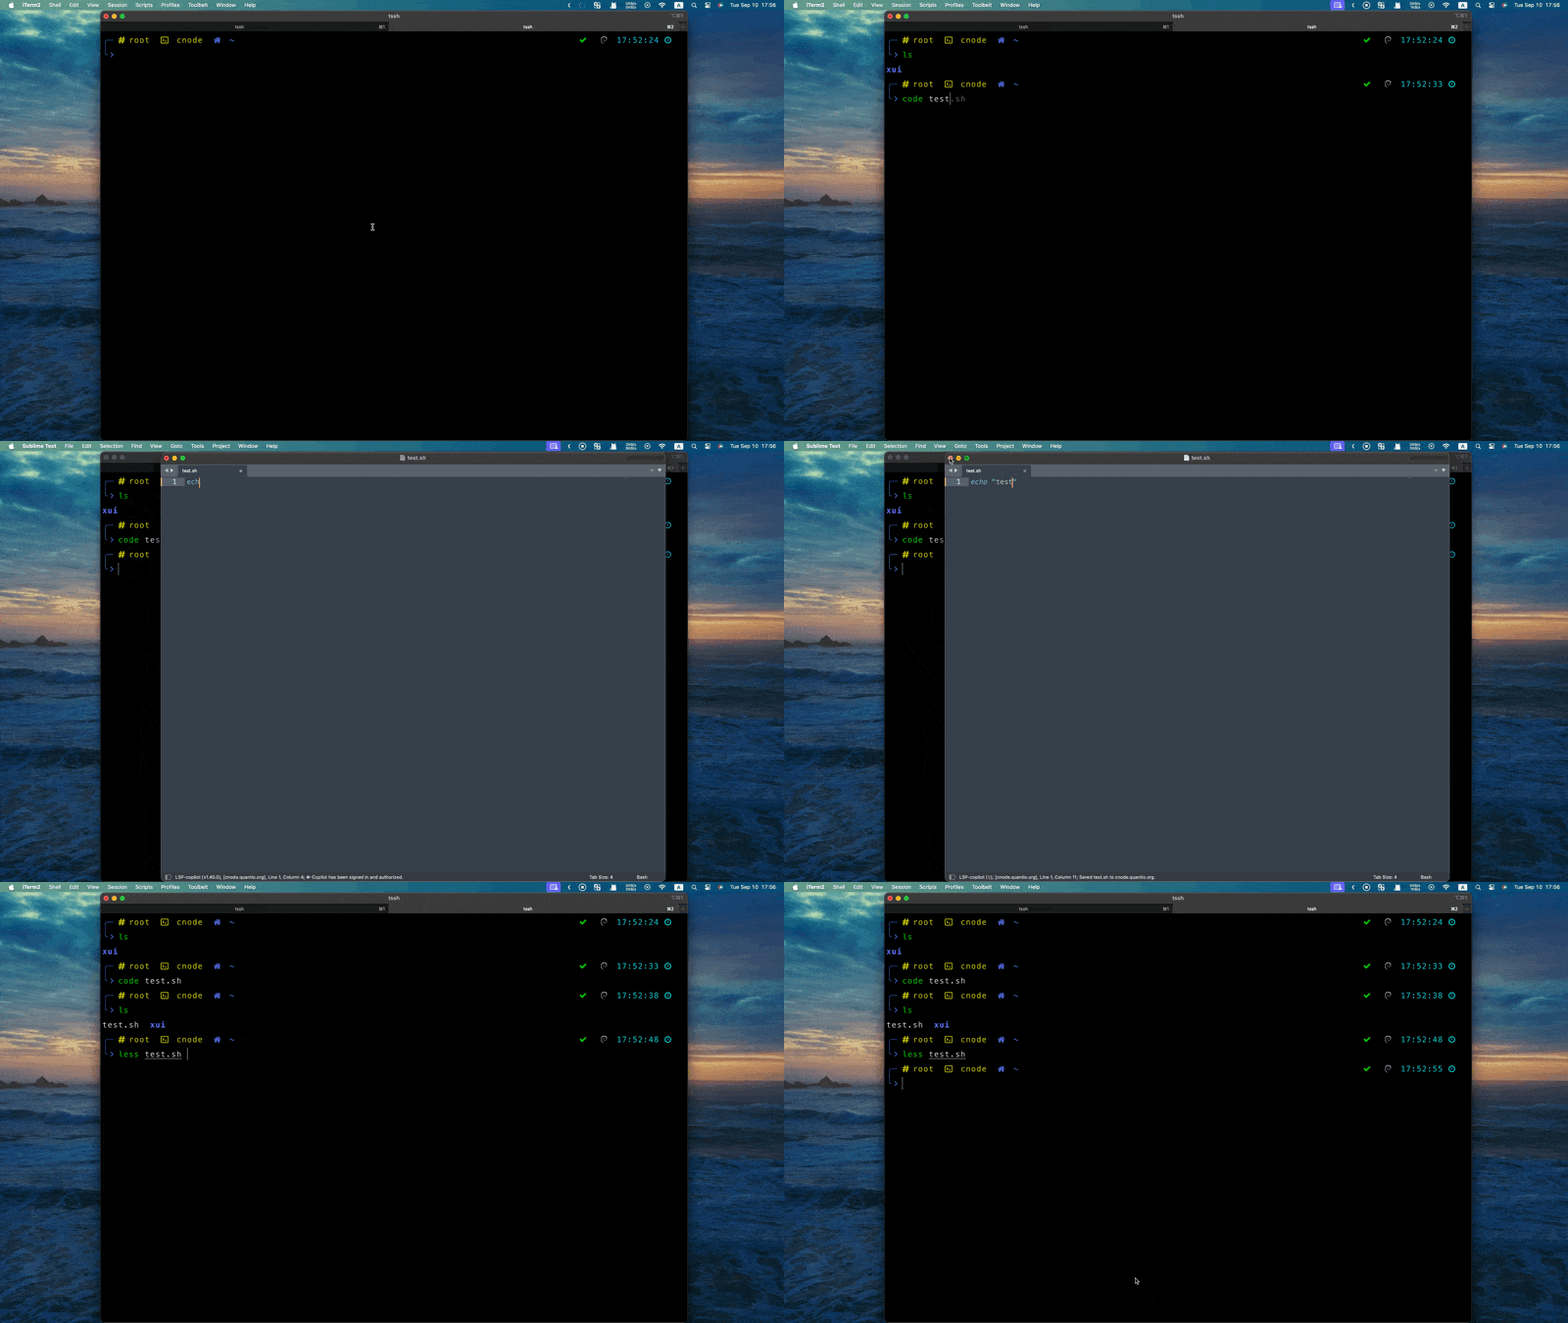
文件编辑新范式!让sublime text / vs code 的强大功能在终端随时可用,code命令可以直接调用本地sublime/vscode查看和编辑本地/远程文件,并自动同步,让每个人都精通vim的方式是取代vim!

A new paradigm for document editing! Let the powerful functions of sublime text vs code be available in the terminal at any time. The code command can directly call local sublime/vscode to view and edit local/remote files, and automatically synchronize them. The way to make everyone proficient in vim is to replace vim!

Demo 4

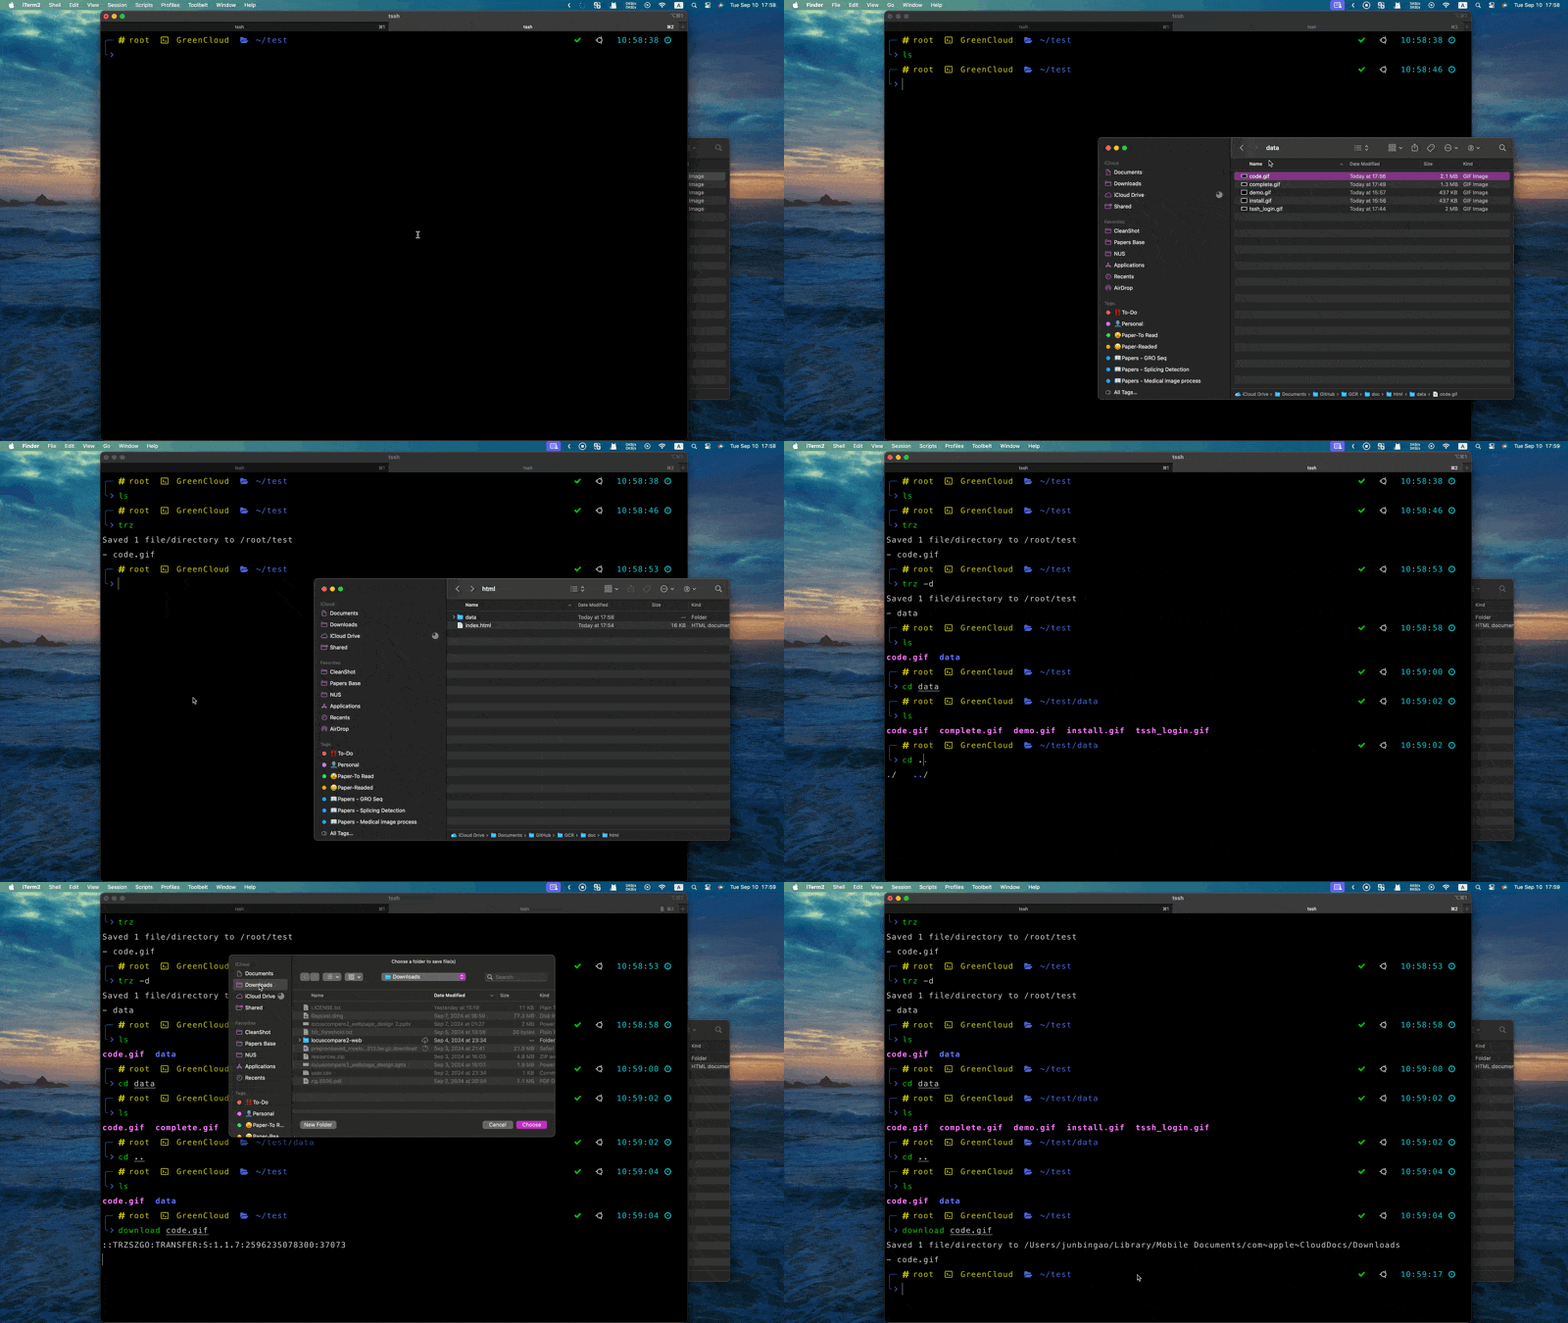
文件传输新范式!所见即所得,支持本地拖拽文件(夹)到终端直接完成上传,或在终端直接下载文件(夹)到本地,不再需要第三方软件和不定期卡死的VS Code!

A new paradigm in file transfer! What you see is what you get. It supports dragging files (folders) locally to the terminal to complete the upload directly, or downloading files (folders) directly from the terminal to the local area. No need for third-party software and VS Code that freezes occasionally!

Demo 5

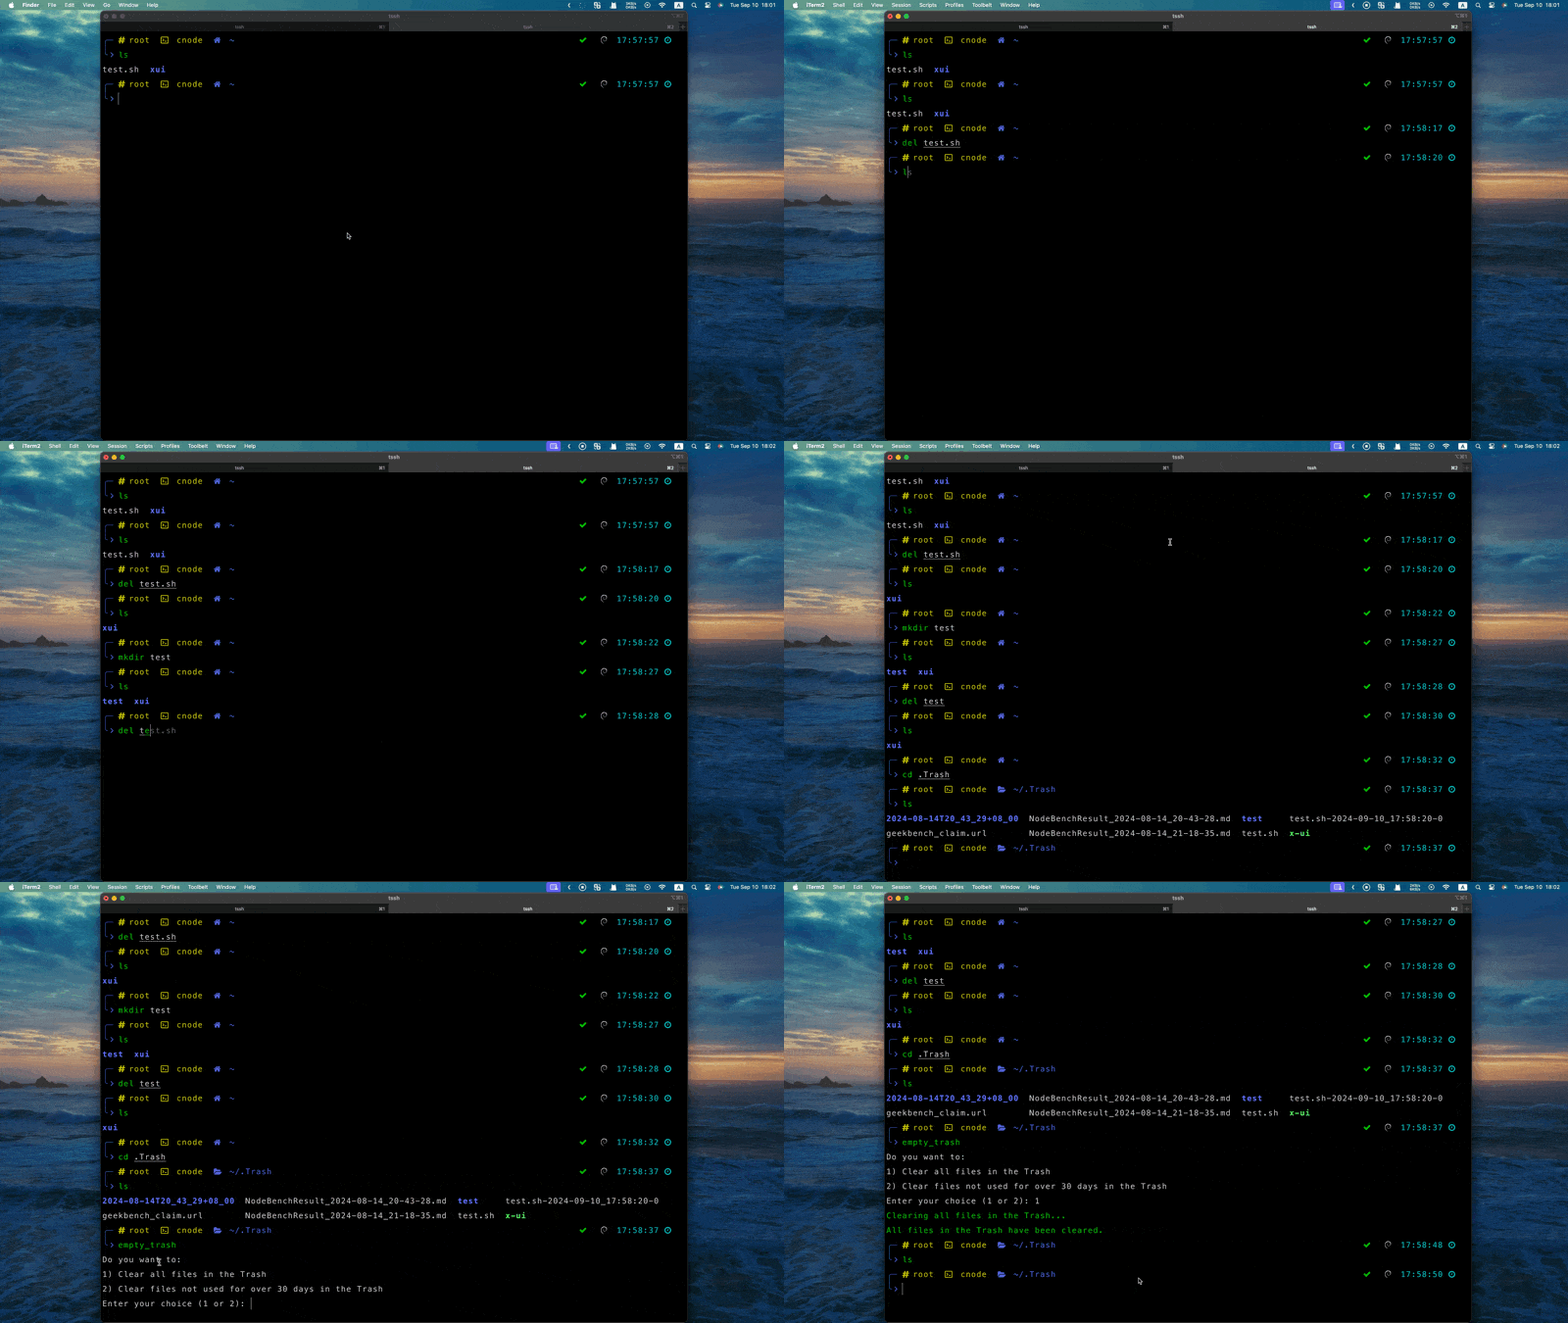
文件删除新范式!del命令取代原生rm命令,删除前再也不用烦恼文件夹前忘记-r,无论是啥,del统统删除,什么,误删了文件怎么办?del自带回收站系统让你轻松找回误删文件!

A new paradigm in file deletion! The del command replaces the native rm command. You no longer have to worry about forgetting - r before deleting a folder. No matter what it is, del will delete it all. What, what should I do if I accidentally delete a file? del comes with a recycle bin system that allows you to easily retrieve accidentally deleted files!

Demo 6

...更多内容持续更新中...

... More content is continuously updated...

安装

Installation

一键式安装(推荐)

One-click Installation

通过以下命令可以快速安装GCR插件:

Use the following command to quickly install the GCR plugin:

curl -s https://raw.githubusercontent.com/gaojunbin/GCR/master/install_gcr.sh -o ~/install_gcr.sh && bash ~/install_gcr.sh && rm ~/install_gcr.sh

您可以按照屏幕提示根据您使用的操作系统和用户权限选择对应的安装方式。

You can follow the on-screen prompts to select the corresponding installation method based on your operating system and user permissions.

目前一键安装支持的操作系统有:Ubuntu, MacOS, NUS HPC, NUS Medicine HPC, NSCC Singapore. 理论上一切支持zsh的操作系统(目前市面上大多数操作系统应该都支持)均可以支持GCR,但是部分操作系统安装zsh的方式略有不同,且某些安装方式需要root权限,不同权限的用户安装方式也会略有不同。 一键脚本在未来会尽可能支持更多操作系统,若在安装过程中遇到问题,可先自行安装zsh,并设置zsh为默认shell,然后再按照脚本内容自行安装GCR即可。

The operating systems currently supported by one-click installation include: Ubuntu, Mac OS, NUS HPC, NUS Medicine HPC, NSCC Singapore. In theory, all operating systems that support zsh (most operating systems currently on the market should support it) can support GCR. However, some operating systems have slightly different ways of installing zsh, and some installation methods require root permissions. The installation methods of users with different permissions will also be slightly different. The one-click script will support as many operating systems as possible in the future. If you encounter problems during the installation process, you can first install zsh yourself, set zsh as the default shell, and then install GCR yourself according to the script content.

由于windows与类unix操作系统底层命令差异较大,短期内不考虑支持。

Since the underlying commands of Windows and Unix-like operating systems are quite different, support will not be considered in the short term.

若您原先较为依赖bashrc / bash_profile的配置,请自行移植需要的配置到zshrc。 继续阅读分步安装有助于你更好的理解如何移植。

If you originally relied on bashrc bash_profile configuration, please transplant the required configuration to zshrc yourself. Continue reading for a step-by-step installation to help you better understand how to migrate.

分步手动安装

Step-by-step Manual Installation

如果您想手动安装,请按以下步骤操作:

If you prefer to install manually, please follow these steps:

  1. 下载GCR插件代码
  2. git clone https://github.com/gaojunbin/GCR.git
  3. 自行安装zsh
  4. 
    sudo apt-get install zsh # Ubuntu
    sudo yum install zsh # CentOS
    brew install zsh # MacOS (Homebrew)
                        

    MacOS市面上大多数系统已经默认预装zsh且作为预设shell (MAC YYDS), 若需要升级zsh版本,可通过Homebrew包管理器,由于MAC经历了x86到arm架构的变化,Homebrew的安装也有细微的改变,官方目前有较为完整的解决方案,可参考Homebrew官网。安装完毕后即可使用Homebrew安装/更新zsh,请注意环境路径,使得系统zsh可以找到并使用你预期路径下的zsh。

    对于其他操作系统,如果是服务器端无法使用一键脚本成功安装,请先确认服务器是否预安装了较新版zsh(部分较老版本的ubuntu等系统预装zsh太旧无法支持完整功能),若需要重新安装zsh,可按照对应系统自行安装。请注意,默认情况下安装zsh需要root权限,如果你所使用的账号没有root权限,你可以从zsh官方下载源代码并自行编译安装(一键脚本中HPC, NSCC等就是采用了这样的解决方案),但是自行编译安装会因为操作系统等因素遇到各种不一样的问题,请关注官方仓库寻求解决方案。oh-my-zsh提供了一些安装指导,供参考。

  5. 安装GCR
  6. GCR基于开源工具oh-my-zsh,但是修改了部分内容,如果您之前已经在使用oh-my-zsh,请先卸载oh-my-zsh并清理原始文件,防止与GCR冲突。

    1) 检查GCR下载的目录以及$HOME下是否有足够的磁盘空间 (GCR不需要很大的空间,但请留出>5GB存储防止意外)

    2) 检查zsh是否正常安装以及版本是否较新 (> 5.0)

    zsh --version

    3) 设置zsh默认shell (有root权限)

    sudo chsh -s $(which zsh) $(whoami) # 如果你有root权限

    3') 设置zsh默认shell (没有root权限)

    # 添加下面的代码到你的默认shell配置下,以bash为例,你可以添加到~/.bashrc或者~/.bash_profile下, $path/to/zsh是你zsh安装的路径
    
    [ -f $path/to/zsh ] && exec $path/to/zsh -l

    4) 进入GCR文件夹并拷贝GCR依赖文件

    cp .ohmyshell ~/
    cp .ohmytool ~/
    cp .ohmyzsh ~/
    cp .p9k.zsh ~/
    cp .ohmyprint ~/
    cp -r oh-my-zsh ~/.oh-my-zsh

    5) 生成GCR配置文件 .zshrc 到$HOME目录下

    SHOW_GCR_INFO=false
    CHECK_GCR_UPDATE=true
    source ~/.ohmyzsh
    source ~/.p9k.zsh
    source ~/.ohmyshell

    6) 迁移原shell中有用的部分

    迁移原shell中有用的部分到新的文件,并在.zshrc中source该文件,也可以直接迁移到.zshrc中,但是建议不要直接写在主文件中

    7) 至此,你的GCR安装完毕!

  1. Download the GCR code
  2. git clone https://github.com/gaojunbin/GCR.git
  3. Install zsh yourself
  4. 
    sudo apt-get install zsh # Ubuntu
    sudo yum install zsh # CentOS
    brew install zsh # MacOS (Homebrew)
                        

    Most systems on the MacOS market have zsh pre-installed as a default shell (MAC YYDS), if you need to upgrade the zsh version, you can use the Homebrew package manager, due to the MAC has gone through a change from x86 to arm architecture, the Homebrew installation has also changed slightly, the official has a more complete solution, can refer to theHomebrew.After the installation is complete, you can use homebrew to install/update zsh. Please pay attention to the environment path so that the system zsh can find and use zsh in your expected path.

    For other operating systems, if the server cannot be successfully installed using a one-click script, please first confirm whether the server has a newer version of zsh pre-installed (some older versions of ubuntu and other systems have pre-installed zsh that is too old to support full functionality). If necessary Reinstall zsh, you can install it yourself according to the corresponding system. Please note that installing zsh requires root permissions by default. If the account you are using does not have root permissions, you can download the source codes from zsh and compile and install it by yourself (HPC, NSCC, etc. in one-click scripts use this solution). However, compiling and installing by yourself will encounter various problems due to operating system and other factors. Please pay attention to the official warehouse for solutions.oh-my-zsh provide some installation instructions for reference.

  5. Install GCR
  6. GCR is based on the open source tool oh-my-zsh, but some contents have been modified. If you have been using oh-my-zsh before, please uninstall oh-my-zsh first and clean the original files to prevent conflicts with GCR.

    1) Check whether there is enough disk space in the directory where GCR is downloaded and $HOME (GCR does not require a large space, but please set aside >5 GB storage to prevent accidents)

    2) Check whether zsh is installed normally and whether the version is newer (> 5.0)

    zsh --version

    3) Set zsh default shell (with root permissions)

    sudo chsh -s $(which zsh) $(whoami) # If you have the root permission

    3') Set zsh default shell (without root permissions)

    # Add the following code to your default shell configuration. Taking bash as an example, you can add it to ~/.bashrc or ~/.bash_profile. $path/to/zsh is the path to your zsh installation.
    
    [ -f $path/to/zsh ] && exec $path/to/zsh -l

    4) Enter the gcr folder and copy the gcr dependency files

    cp .ohmyshell ~/
    cp .ohmytool ~/
    cp .ohmyzsh ~/
    cp .p9k.zsh ~/
    cp .ohmyprint ~/
    cp -r oh-my-zsh ~/.oh-my-zsh

    5) Generate the GCR configuration file .zshrc to the $HOME directory

    SHOW_GCR_INFO=false
    CHECK_GCR_UPDATE=true
    source ~/.ohmyzsh
    source ~/.p9k.zsh
    source ~/.ohmyshell

    6) Migrate useful parts of the original shell

    Migrate useful parts of the original shell to a new file and source the file in .zshrc. You can also migrate it directly to .zshrc, but it is recommended not to write it directly in the main file.

    7) At this point, your gcr is installed!

使用说明 下载PDF手册

Usage Download PDF Manual

加载中...

Customization

常见问题 (FAQ)

Frequently Asked Questions (FAQ)

问题 1:GCR 这个名字是否有特殊的含义?

Question 1: Does the name has special meaning?

项目建立时刚从微软离职,微软的集群使用中有名为GCR的工具,叫着顺口遂取名为GCR。

No.

问题 2:如何安装 GCR 插件?

Question 2: How to install the GCR plugin?

您可以通过一键式安装命令来快速安装,或按照手动步骤操作。

You can install it using the one-click installation command or follow the manual steps.

问题 3:如何自定义 GCR 插件配置?

Question 3: How to customize GCR plugin configurations?

GCR 插件支持丰富的自定义功能,您可以通过编辑配置文件进行个性化设置。

GCR supports extensive customization options, and you can personalize it by editing the configuration file.

联系我们

Contact

您可以通过以下方式反馈你的意见和建议:

You can reach us through the following methods: